Configuring your Google account for SAML authentication
Last updated: June 12, 2026
Follow these steps to configure your Google account to authenticate using SAML with your identity provider. You can create different configurations for our production environment vs. play environment.
Step 1: Create a Custom SAML App in Google
Sign in to the Google Admin Console.
Go to Apps > Web and mobile apps.
Click Add app > Add custom SAML app.
Enter a name for your app (e.g., Factor SAML), and optionally upload an app logo.
Click Continue.
Step 2: Download the Google SAML Metadata
On the Google IdP Information page, download the IDP metadata file before proceeding.
You'll need to provide this file to your Factor representative later.
Click Continue.
Step 3: Configure SAML Settings
Enter the following Service Provider details:
ACS URL if configuring for the Production environment:
https://idp.usefactor.io/saml2/idpresponseACS URL if configuring for the Play environment:
https://idp.play.usefactor.io/saml2/idpresponseEntity ID if configuring for the Production environment:
urn:amazon:cognito:sp:ap-southeast-2_FXF31XNiaEntity ID if configuring for the Play environment:
urn:amazon:cognito:sp:ap-southeast-2_be7W0jatC
Set the following options:
Signed response: ✔ Enabled
Name ID format: EMAIL
Name ID: Basic Information → Primary email
Click Continue.
Step 4: Map Attributes
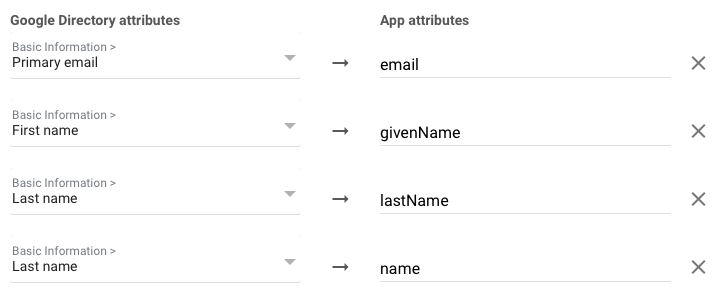
Add the following attribute mappings:
Google Directory Attribute | App Attribute |
Basic Information → Primary email | |
Basic Information → First Name | givenName |
Basic Information → Last name | lastName |
Basic Information → Last name | name |
Two mappings are required for "Last name", lastName and name.
When completed, it should look like this:
Step 5: Assign Users
In the User Access section, choose ON for everyone, or select specific groups to enable.
Click Finish.
Your Google account is now configured for SAML authentication with Factor. Before you can access your Factor instance, you'll need to provide the IDP metadata file to Factor. We'll then configure your instance ASAP to get you started.