How do I configure sales force api credentials to call Factor APIs?
Last updated: September 16, 2025
Overview
This article explains how to set up Named Credentials in Salesforce for OAuth2 authentication using the Client Credentials flow, and how to utilise these credentials in Integration Procedures for secure API integrations.
Prerequisites
System Administrator or equivalent permissions
Valid OAuth2 client credentials (Client ID and Client Secret), and a scope provided from Factor
OmniStudio or Vlocity package installed (for Integration Procedures)
Part 1: Understanding External Credential Requirements
Important: In scenarios where Named Credentials must use External Credentials, the traditional direct Named Credential configuration is not sufficient. This guide focuses on the External Credential approach as the required method.
Part 2: Creating an External Credential
Step 1: Create External Credential
Navigate to Named Credentials in Setup
Click External Credentials
Click New
Configure:
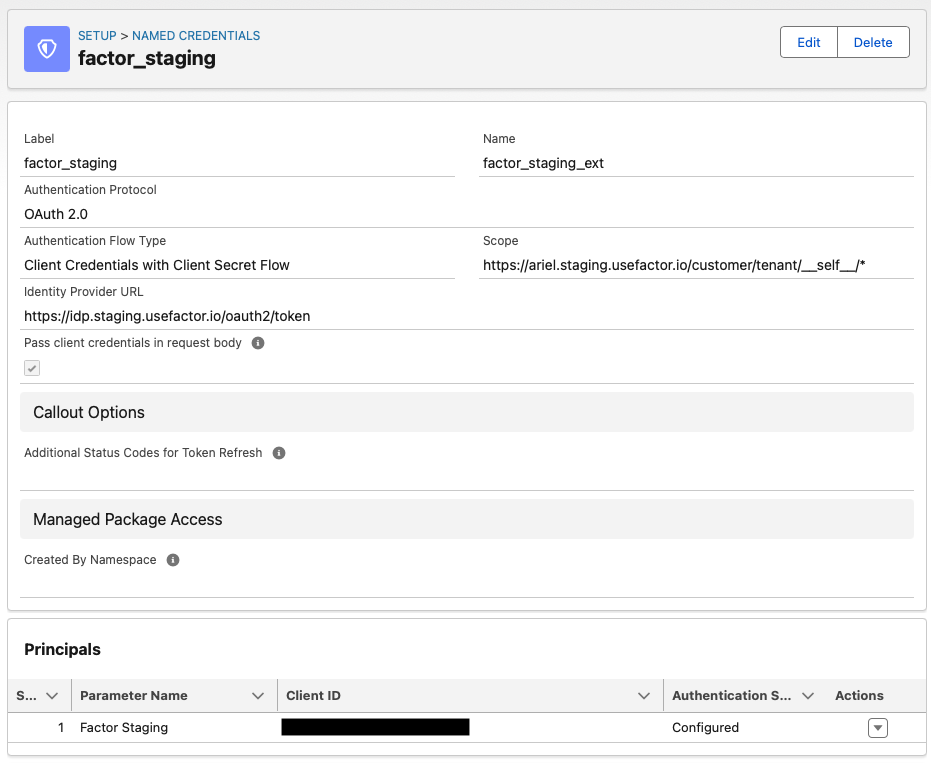
Master Label: Descriptive name (e.g., "Factor APIs")
Developer Name: Auto-populated (e.g., "
factor_api") . Note this value, you'll need it for step 6.Authentication Protocol: OAuth 2.0
Authentication Flow Type: Client Credentials with Client Secret Flow
Identity Provider URL https://idp.usefactor.io/oauth/token
Check Pass client credentials in request body
Click Save
Step 2: Add Principals
After saving, scroll to New in the Principals section
Create the Client ID principal:
Parameter Name:
client_idParameter Value: Enter your OAuth2 client ID
Parameter Type: Text
Click Save, then add another principal
Create the Client Secret principal:
Parameter Name:
client_secretParameter Value: Enter your OAuth2 client secret
Parameter Type: Password
When completed, your eternal credential should look like this:
Step 3: Create Named Credential with External Credential
Create a new Named Credential
Configure basic settings:
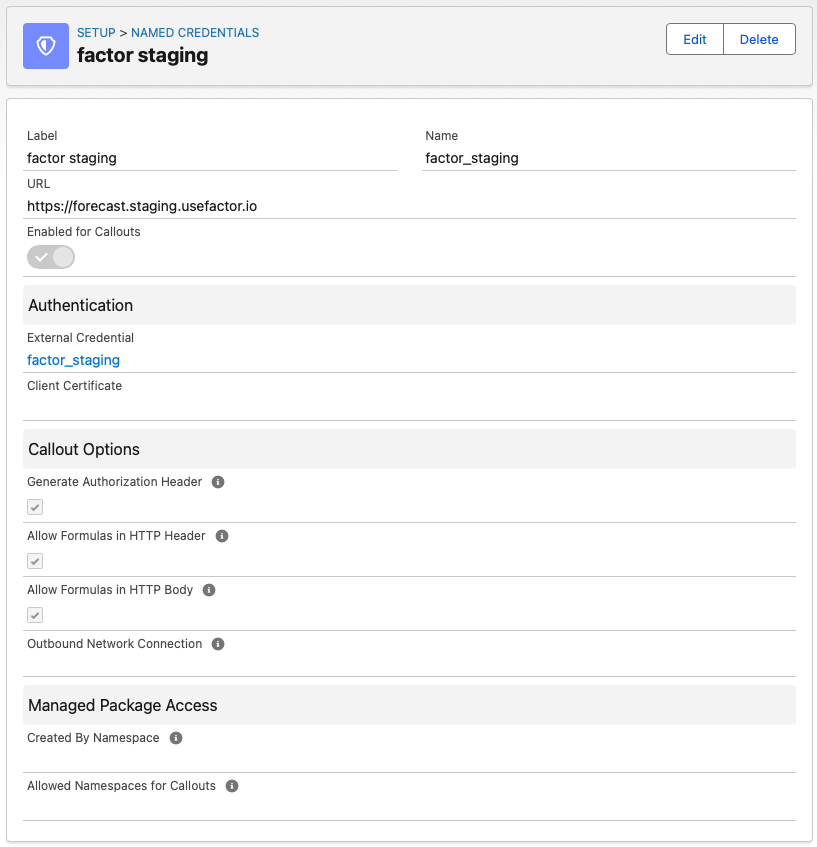
Label: Descriptive name
Name: Auto-populated
URL: Base URL of the factor APIs
https://forecast.usefactor.io
In Authentication section:
External Credential: Select your created External Credential
Call out Options
Generate Authorization Header: Check this box
Allow Merge Fields in HTTP Header: Check this box
Allow Merge Fields in HTTP Body: Check this box
When completed your Named Credential should look like this:
Part 3: Configure and assign permissions
Step 4: Configure Permission Set for External Credential Access
Navigate to Permission Sets in Setup
Create a new Permission Set or modify an existing one:
Label: Factor External Credential Access (or descriptive name)
API Name: Auto-populated
License: None (for maximum flexibility)
After saving, click External Credential Principal Access
Click Edit
Select your External Credential and move it to Enabled External Credential Principal Access
Save the Permission Set.
After save ensure the following have not been set by default:
Session Activation Required
Licenses required
Step 4: Assign Permission Set to Users
From the Permission Set detail page, click Manage Assignments
Click Add Assignments
Select the users who need access to the External Credential
Click Assign and then Done
Alternative: Profile-Based Access
Navigate to Profiles in Setup
Select the appropriate profile
Click External Credential Principal Access
Click Edit
Select your External Credential and move it to Enabled External Credential Principal Access
Save the changes
Part 4: Update remote Sites
Step 6: Update the Remote Site configuration settings
Navigate to remote site settings
Add the following remote sites:
https://forecast.usefactor.iohttps://forecast.staging.usefacgtor.iohttps://idp.usefactor.iohttps://idp.staging.usefactor.io
Part 5: Update integration procedure
Step 7: Use the Credentials in your Integration Procedures
Navigate to your integration procedure
Select your HTTP Request module
Request URL: e.g.
/forecast/forecastRequests/(do NOT enter the full host and domain)Named credential: input the value you configured for your external credential in step 3.1 e.g.
factor_api
Save the integration procedure
Before activating the procedure, select preview to test
the credential isAccessible by the user
The http module in your integration procedure can access the factor end point